
Let’s address the elephant in the room: shooting film is expensive, and it’s only getting worse. We all love the aesthetic, the satisfying mechanical clunk of a manual shutter, and the deliberate slowness that forces us to actually think before we press the button. But somewhere between the nostalgia and the reality, the math stopped making sense. Here’s how to make it reasonable again.
A roll of professional color negative stock now runs approximately $15 to $22, and that’s before you’ve even shot a single frame. Add another $15 to $20 for lab development and scanning, and you’re looking at roughly $35 to $40 just to see your 36 images on a screen. The so-called “Film Renaissance” that swept through photography over the past decade has quietly transformed from an accessible creative choice into something approaching a luxury hobby.
Here’s the good news: film does not have to be this expensive. The costs that feel inevitable are actually the result of specific workflow choices, and by rethinking those choices, you can cut your cost-per-shot by 50% or more without sacrificing the experience that drew you to analog photography in the first place. These aren’t suggestions to simply “shoot less” or “be more intentional.” These are concrete, actionable workflow changes that working photographers can implement immediately.
1. Buy a Half-Frame Camera
The simplest way to cut your film costs in half is to literally cut your frames in half. Half-frame cameras shoot roughly 17 to 18x24mm images, typically in a portrait orientation, on standard 35mm film, which means a typical 36-exposure roll yields about 72 shots. The format was popular in the 1960s and 1970s as a consumer-friendly way to make photography more economical, and the same math works just as well today.
 Let’s break down the numbers. With standard 35mm, factoring in film cost plus development and scanning, you’re paying somewhere between $0.70 and $1.00 per shot depending on your stock and lab choices. Switch to half-frame and that drops to $0.35 to $0.50 per shot. You’re using the exact same film and the exact same development process; you’re just getting twice as many images out of each roll. Over the course of a year, if you’re shooting even moderately regularly, that adds up to hundreds of dollars in savings.
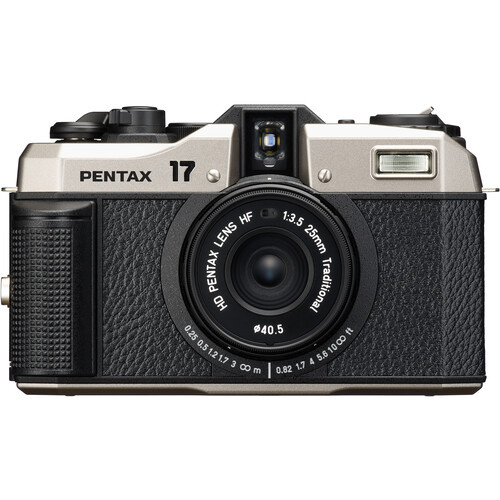
The gear options span from vintage classics to brand new releases. On the vintage side, the Olympus Pen F remains the gold standard, offering interchangeable lenses and SLR-quality optics in a half-frame body. The Canon Demi series and Ricoh Auto Half are more affordable entry points that still deliver excellent results. For those who prefer buying new with a warranty, Pentax released the Pentax 17 in 2024, bringing half-frame back to modern production with contemporary features and build quality. The common objection to half-frame is resolution, and it’s a fair point. Scanning technology has made half-frame more practical than it used to be, but it’s still a resolution and grain tradeoff. The files you get from a well-scanned half-frame negative are more than adequate for social media, web use, and prints up to 5×7. Unless you’re making gallery prints, you likely won’t notice the difference in most viewing contexts.
2. Bulk Load Your Black and White
If you shoot black and white with any regularity, bulk loading is one of those “why didn’t I do this sooner” discoveries. Instead of buying individual 36-exposure canisters, you purchase a 100-foot bulk roll and load your own cassettes using a daylight loader. It’s old-school in the best way, and the savings are substantial.
Consider the economics of Ilford HP5 Plus, one of the most popular black and white stocks for everyday shooting. An individual 36-exposure roll currently costs around $11. A 100-foot bulk roll runs approximately $155, and from that single bulk roll you can load between 18 and 23 36-exposure cassettes depending on how generous you are with your leaders and tails. That brings your per-roll cost down to roughly $7.50. Budget emulsions offer even steeper bulk savings. It’s worth noting that not every emulsion delivers the same value in bulk format, so check current prices before committing to a 100-foot roll of any particular stock. The equipment required is minimal: a daylight bulk loader, a supply of reusable cassettes, and a dark bag or changing bag for the initial loading of the bulk roll into the loader.
Beyond the pure cost savings, bulk loading offers a flexibility that factory rolls cannot match. Need to test a camera you just picked up but don’t want to commit a full 36-exposure roll? Load a 10-shot test roll. Want to shoot a quick 12-frame roll for a specific project? You can do that. The ability to customize your roll length means you waste less film on test shots and have more control over your workflow.
3. Stop Paying for Lab Scans (Invest in Your Own Scanner)
The single largest recurring expense in analog photography isn’t the film itself; it’s the development and scanning package that most labs offer as their standard service. That $15 to $20 you’re paying per roll is mostly going toward the scanning portion. Switch to “develop only” service, which typically runs $5 to $11 depending on whether you’re using a local lab or a mail-in service, and scan your negatives yourself. The upfront investment in scanning equipment pays for itself faster than you might expect.
The flatbed scanner route remains the most accessible entry point. The Epson V850 is a top-tier flatbed option for home scanning, handling both 35mm and 120 medium format with results that satisfy most enthusiast and small-print needs. It typically sells for around $1,500 new, which is a significant upfront investment but pays for itself over time if you’re a regular shooter. Used V600 units can still be found for around $200 to $300 and deliver perfectly acceptable results for most purposes. Either option gives you complete control over your scans, allowing you to adjust exposure, color balance, and cropping without being locked into whatever the lab technician decided looked good.
 If you already own a high-resolution digital camera and a macro lens, camera scanning is worth serious consideration. The process requires a light source, a film holder, and some practice with your technique. With a solid setup and careful alignment, camera scanning can deliver exceptional results, sometimes rivaling high-end dedicated scanners. The learning curve is steeper than flatbed scanning, but the speed and quality ceiling are both higher.
There’s also a niche solution worth mentioning for those whose cost burden isn’t current shooting but rather digitizing archives. The Epson FastFoto FF-680W is designed specifically for scanning prints at high speed (it doesn’t scan negatives), processing one 4×6 photo per second. If you have boxes of old family prints that need digitizing, this machine will accomplish the task far more economically than any service bureau. Check out my review here.
The savings from home scanning compound quickly. At just two rolls per month, which is modest shooting for most enthusiasts, scanning your own negatives keeps a few hundred per year in your pocket. Over several years of shooting, you’re looking at equipment that has paid for itself many times over.
4. Switch to Budget Stocks (and Own the Grain)
The film photography community has developed an almost religious devotion to certain professional stocks, and the marketing has been remarkably effective. Portra 400 is treated as the default choice for portraiture and travel, HP5 Plus as the obvious selection for black and white street work. But here’s the thing: you do not need Portra 400 for a walk in the park. You do not need professional-grade emulsion for casual snapshots of your friends at a backyard barbecue. The “budget” stocks exist for a reason, and the results they produce are not just acceptable but often genuinely beautiful in their own right.
For color work, consider swapping that roll of Portra for Kodak Gold 200 or Kodak ColorPlus 200, both of which run around $8 to $10 per roll when purchased in 3-packs. These consumer stocks have a warmer, more nostalgic rendering that many photographers actually prefer to the clinical neutrality of professional emulsions. The grain is more present, the colors are more saturated, and the overall look is arguably more “film-like” than the stocks that try to compete with digital on technical terms. For black and white, the alternatives to Ilford HP5 Plus and Delta include Kentmere (actually made by Ilford), Fomapan, and Arista. These stocks run cheaper compared to name-brand options.
The practical approach is to reserve your professional stocks for situations where they genuinely matter: paid client work, once-in-a-lifetime travel, portfolio projects where you need maximum latitude and predictability. For everything else, for daily life and street photography and casual experiments, the consumer stocks deliver results that will make you happy at a fraction of the cost.
5. Develop C-41 at Home (It’s Easier Than You Think)
The final frontier of film cost reduction is home development, and for most photographers, the mental barrier here is color negative processing. Black and white development at home has been common practice since the format existed, but color (C-41) chemistry is surrounded by mythology about precise temperature requirements and complicated procedures that intimidate people away from even trying. The reality in 2025 is far simpler than the reputation suggests.
C-41 is temperature-sensitive, which is the source of its intimidating reputation. Many kits are designed around either 100°F (37.8°C) or 102°F (39°C) with corresponding time adjustments, and maintaining that temperature throughout the development time used to require either professional equipment or constant attention with a thermometer. The modern solution is almost absurdly simple: use a sous-vide immersion circulator, the same device people use to cook steaks. Fill a container with water, set the sous-vide to 102°F, and place your chemical bottles in the bath. The circulator maintains perfect temperature indefinitely with zero attention required. This piece of kitchen equipment has single-handedly democratized home C-41 processing.
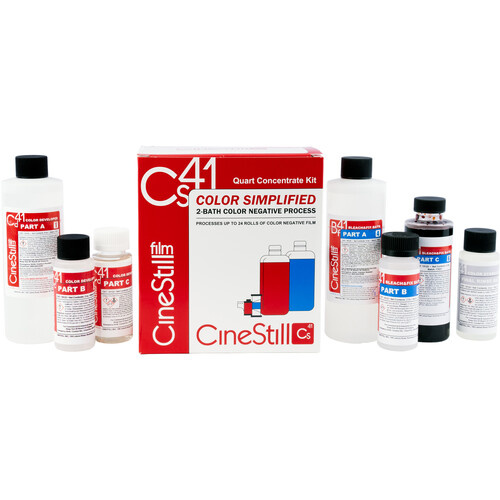 The chemistry itself has also been simplified. Current kits from CineStill and Unicolor use a two-bath process consisting of developer and blix (a combined bleach-fix solution). The procedure involves the same basic steps as black and white development: load the film onto a reel in the dark, pour in developer, agitate, pour out, pour in blix, agitate, pour out, wash, then a final rinse or stabilizer (depending on the kit), and hang to dry. The entire process takes about 15 minutes of active work. A $30 kit will process somewhere between 15 and 20 rolls of film depending on how carefully you manage the chemistry. Compare that to $10 per roll for development-only service at a lab, and the savings become obvious immediately.
The other benefit of home development that often goes unmentioned is time. Most labs have turnaround times measured in days or weeks, and mail-order labs obviously add shipping time on top of processing time. Develop at home and you can have negatives loaded, processed, and hung to dry within about an hour of finishing your roll. For photographers who want to see their results while the shoot is still fresh in their minds, or who simply hate waiting, that immediacy is worth something beyond the pure dollar savings.
The Bottom Line
Film photography in 2026 does not have to be an elite hobby accessible only to those with disposable income to burn. It requires being smarter about consumption and more willing to invest some labor in exchange for significant savings. A photographer who implements even two or three of these strategies can easily cut their per-image costs by half or more, which translates directly into the ability to shoot more and experiment more freely.
The path you choose depends on your needs and desires. Half-frame cameras offer savings with minimal workflow change. Bulk loading makes sense for dedicated black and white shooters. Home scanning is nearly universal in its benefit. Budget stocks require only a willingness to let go of marketing-driven expectations. Home C-41 development asks for the most commitment but delivers both cost savings and workflow improvements. Mix and match according to what fits your preference.