Hands On For all the buzz surrounding them, AI agents are simply another form of automation that can perform tasks using the tools you’ve provided. Think of them as smart macros that make decisions and go beyond simple if/then rules to handle edge cases in input data. Fortunately, it’s easy enough to code your own agents and below we’ll show you how.
Since ChatGPT made its debut in late 2022, literally dozens of frameworks for building AI agents have emerged. Of them, LangFlow is one of the easier and more accessible platforms for building AI agents.
Originally developed at Logspace before being acquired by DataStax, which was later bought by Big Blue, LangFlow is a low-code/no-code agent builder based on LangChain. The platform allows users to assemble LLM-augmented automations by dragging, dropping, and connecting various components and tools.
In this hands-on guide, we’ll be taking a closer look at what AI agents are, how to build them, and some of the pitfalls you’re likely to run into along the way.
The anatomy of an agent
Before we jump into building our first agent, let’s talk about what comprises an agent.

At its most basic, an agent is composed of three main components: a system prompt, tools, and the model. – Click to enlarge
In general, AI agents are going to have three main components, not counting the output/action they ultimately perform or the input/trigger that started it all.
- A system prompt or persona: This describes the agent’s purpose, the tools available to it, and how and when they should be used in natural language. For example: “You’re a helpful AI assistant. You have access to the GET_CURRENT_DATE tool which can be used to complete time or date related tasks.”
- Tools: A set of tools and resources that the model can call upon to complete its task. This can be as simple as a GET_CURRENT_DATE or PERFORM_SEARCH function, or an MCP server that provides API access to a remote database.
- The Model: The LLM, which is responsible for processing the input data or trigger and using the tools available to it to complete a task or perform an action.
For more complex multi-step tasks, multiple models, tools, and system prompts may be used.
What you’ll need:
- To get started, you’ll need a Mac, Windows, or Linux box to run the LangFlow Desktop.
- Linux users will need to download and install Docker Engine first using the instructions here.
- Access to an LLM and embedding model. We’ll be using Ollama to run these on a local system, but you can just as easily open an OpenAI developer account and use their models as well.
If you’re using a Mac or PC, deploying LangFlow Desktop is as simple as downloading and running the installer from the LangFlow website.
If you’re running Linux, you’ll need to deploy the app as a Docker container. Thankfully this is a lot easier than it sounds. Once you’ve got the latest release of Docker Engine installed, you can launch the LangFlow server using the one-liner below:
sudo docker run -d -p 7860:7860 –name langflow langflowai/langflow:latest
After a few minutes, the LangFlow interface will be available at http://localhost:7860.
Warning: If you’re deploying the Docker container on a server that’s exposed to the web, make sure to adjust your firewall rules appropriately or you might end up exposing LangFlow to the net.
Getting to know LangFlow Desktop

LangFlow Desktop’s homepage is divided into projects on the left and flows on the right. – Click to enlarge
Opening LangFlow Desktop, you’ll see that the application is divided into two sections: Projects and Flows. You can think of projects as a folder where your agents are stored.
Clicking “New Flow” will present you with a variety of pre-baked templates to get you started.

LangFlow’s no-code interface allows you to build agents by dragging and dropping components from the sidebar into a playground on the right. – Click to enlarge
On the left side of LangFlow Desktop, we see a sidebar containing various first and third-party components that we’ll use to assemble an agent.
Dragging these into the “Playground,” we can then config and connect them to other components in our agent flow.
In the case of the Language Model component shown here, you’d want to enter your OpenAI API key and select your preferred version of GPT. Meanwhile, for Ollama you’ll want to enter your Ollama API URL, which for most users will be http://localhost:11434, and select a model from the drop down.
If you need help getting started with Ollama, check out our guide here.
Building your first agent
With LangFlow up and running, let’s take a look at a couple of examples of how to use it. If you’d like to try these for yourself, we’ve uploaded our templates to a GitHub repo here.
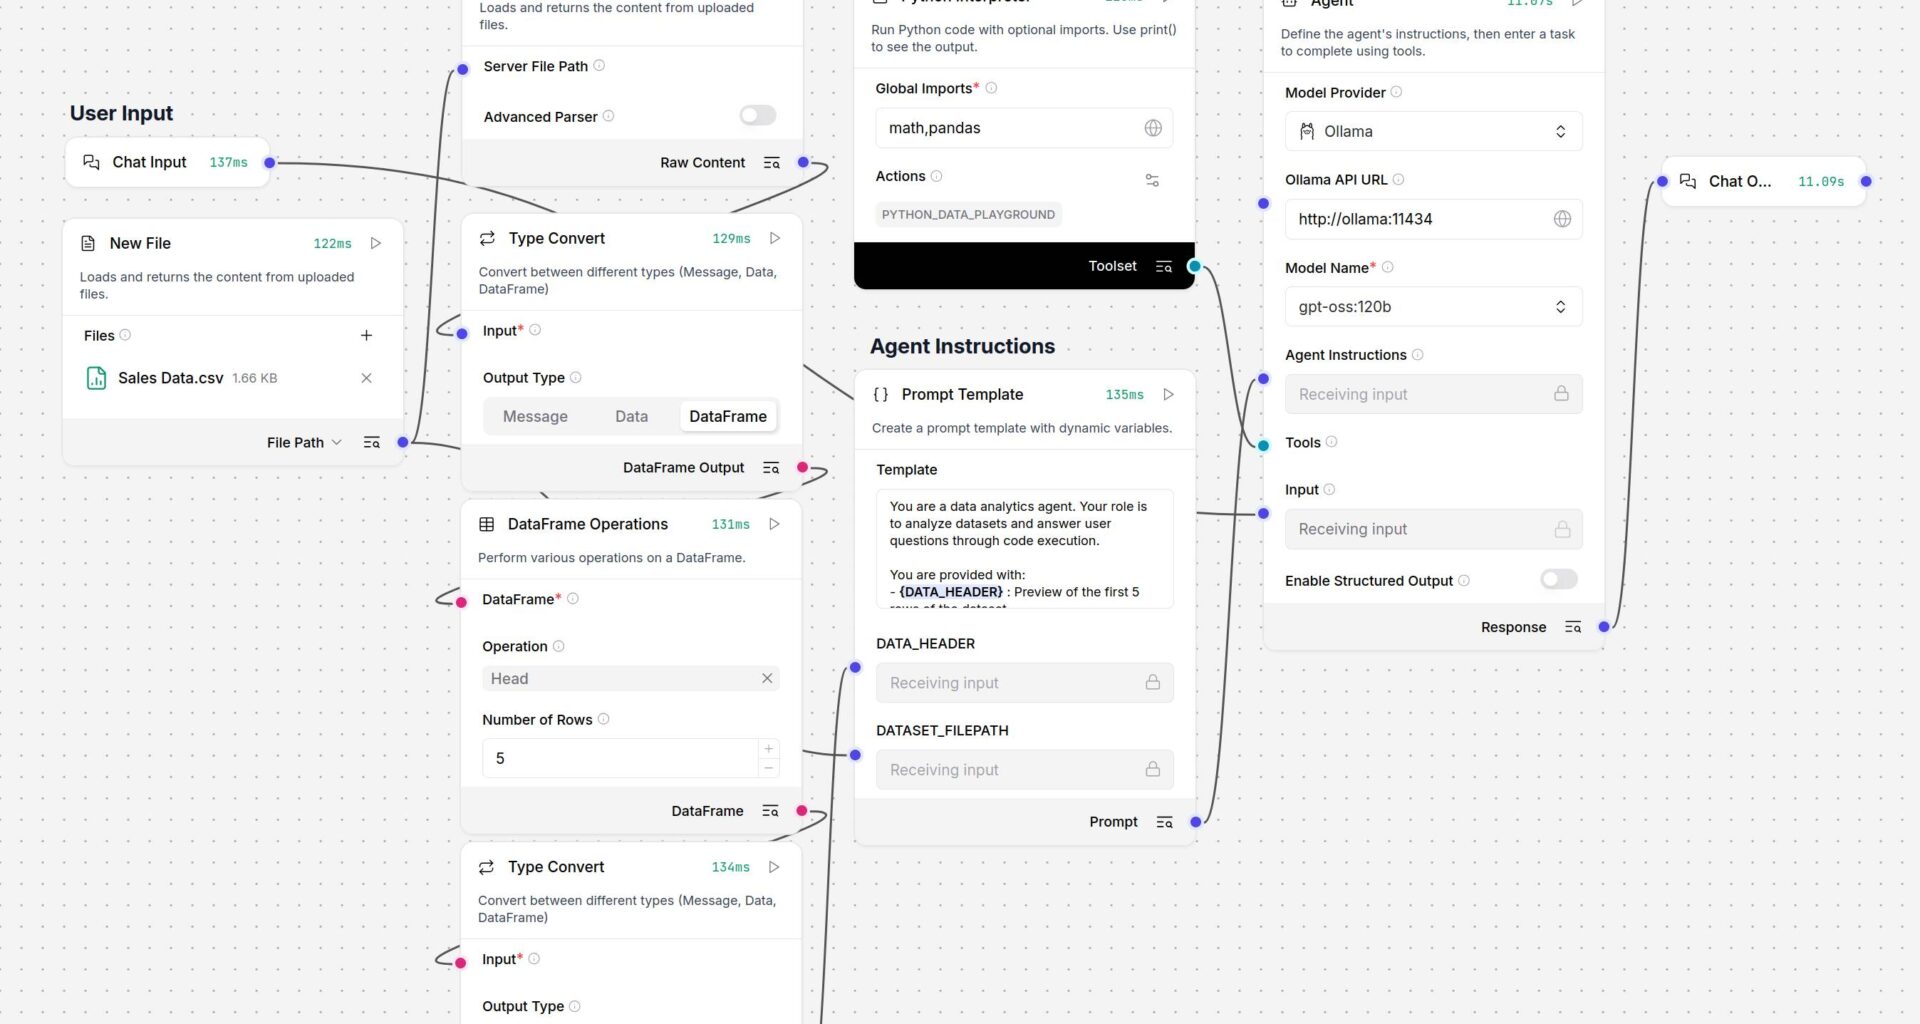
In this example, we’ve built a relatively basic agent to analyze spreadsheets stored as CSVs, based on user prompts.

This data analytics agent uses a Python interpreter and an uploaded CSV to answer user prompts – Click to enlarge
To help the agent understand the file’s data structure, we’ve used the Type Convert and DataFrame Operations components to extract the dataset’s schema and help the model understand the file’s internal structure.
This, along with the full document’s file path, is passed to a prompt template, which serves as the model’s system prompt. Meanwhile, the user prompt is passed through to the model as an instruction.

LangFlow’s Prompt Template enables multiple data sources to be combined into a single unified prompt. – Click to enlarge
Looking a bit closer at the prompt template, we see {DATA_HEADER} and {DATASET_FILEPATH} defined as variables. By placing these in {} we’ve created additional nodes to which we can connect our database schema and file path.
Beyond this, the system prompt contains basic information on how to service user requests, including instructions on how to call the PYTHON_DATA_PLAYGROUND Python interpreter, which we see just above the prompt template.
This Python interpreter is connected to the model’s “tool” node and apart from allowlisting the Pandas and Math libraries, we haven’t changed much more than the interpreter’s slug and description.

The agent’s data analytics functionality is achieved using a Python interpreter rather than relying on the model to make sense of the CSV on its own. – Click to enlarge
Based on the information provided to it in the system and user prompts, the model can use this Python sandbox to execute code snippets and extract insights from the dataset.
If we ask the agent “how many monitors we sold,” in the Langflow playground’s chat, we can see what code snippets the model executed using the Python interpreter and the raw response it got back.

As you can see, to answer our question, the model generated and executed a Python code snippet to extract the relevant information using Pandas – Click to enlarge
Obviously, this introduces some risk of hallucinations, particularly on smaller models. In this example, the agent is set up to analyze documents it hasn’t seen before. However, if you know what your input looks like — for example, if the schema doesn’t change between reports — it’s possible to preprocess the data, like we’ve done in the example below.

Rather than relying on the model to execute the right code every time, this example uses a modified Python interpreter to preprocess the data of two CSVs or Excel files before passing it to the model for review – Click to enlarge
With a couple of tweaks to the Python interpreter, we’ve created a custom component that uses Pandas to compare a new spreadsheet against a reference sheet. This way the model only needs to use the Python interpreter to investigate anomalies or answer questions not already addressed by this preprocessing script.
Models and prompts matter
AI agents are just automations that should, in theory, be better at handling edge cases, fuzzy logic, or improperly formatted requests.
We emphasize “in theory,” because the process by which LLMs execute tool calls is a bit of a black box. What’s more, our testing showed smaller models had a greater propensity for hallucinations and malformed tool calls.
Switching from a locally-hosted version of OpenAI’s gpt-oss-120b to GPT-5 Nano or Mini, we saw a drastic improvement in the quality and accuracy of our outputs.
If you’re struggling to get reliable results from your agentic pipelines, it may be because the model isn’t well suited to the role. In some cases, it may be necessary to fine tune a model specifically for that application. You can find our beginner’s guide to fine tuning here.
Along with the model, the system prompt can have a significant impact on the agent’s performance. The same written instructions and examples you might give an intern on how to perform a task are just as useful for guiding the model on what you do and don’t want out of it.
In some cases, it may make more sense to break up and delegate a task to different models or system prompts in order to minimize the complexity of each task, reduce the likelihood of hallucinations, or cost optimize by having lower cost models tackle easier pieces of the pipeline.
Next steps
Up to this point, our examples have been triggered by a chat input and returned a chat output. However, this isn’t strictly required. You could set up the agent to detect new files in a directory, process them, and save its output as a file.
LangFlow supports integrations with a wide variety of services that can be extended using agentic protocols or custom components written in Python. There’s even a Home Assistant tie-in if you want to build an agent to automate your smart home lights and gadgets.
Speaking of third-party integrations, we’ve hardly scratched the surface of the kinds of AI-enhanced automation that are possible using frameworks like LangFlow. In addition to the examples we looked at here, we highly recommend checking out LangFlow’s collection of templates and workflows.
Once you’re done with that, you may want to explore what’s possible using frameworks like Model Context Protocol (MCP). Originally developed by Anthropic, this agentic protocol is designed to help developers connect models to data and tools. You can find more on MCP in our hands-on guide here.
And while you’re at it, you may want to brush up on the security implications of agentic AI, including threats like prompt injection or remote code execution, and ensure your environment is adequately sandboxed before deploying them in production. ®